Friday, 29 May 2015

Highland Game Buffalo Burgers on Rolls with Bacon, Egg and Wedges

Buffalo burger on a roll with bacon and fried egg served with potato wedges

I am always on the look-out for new foodstuffs to try and genuinely do get a real buzz when I come across something really different and appealing for the first time. This usually happens when I'm travelling or visiting a new supermarket/shop but occasionally I find great new products much closer to home. In this instance, I was taking a browse around my local Morrsions when I happened to spy this new product from Highland Game. I'm very familiar with Highland Game and enjoy their venison products on a regular basis so I didn't hesitate when it came to picking up a pack of these burgers to sample.

Scottish Highland Game buffalo burger

I'm actually not sure whether this was the first time I had ever tasted buffalo but it was certainly the first time I had ever tasted buffalo burgers. What I decided to do was take the traditional, American burger concept and adapt it a little bit to incorporate more Scottish products and concepts.

Baby potatoes ready for boiling


Ingredients per Person

1 Highland Game buffalo burger
6 or 7 baby new potatoes
Salt
Scottish rapeseed oil
2 rashers of back bacon
1 large egg
1 large Scottish bread roll
Malt vinegar (optional)

Boiled potatoes are steamed before being left to cool

Directions

It's necessary to first of oil cook the potatoes by boiling and allow them to cool completely. Simply wash but don't peel them and add them to a pot of cold, salted water. Bring the water to a simmer for twenty minutes or so until the potatoes are just softening and no more. Drain through a colander, allow to steam for a few minutes then cover and leave to cool.

Starting to griddle buffalo burger

The burger here was griddled rather than fried. This is a great way of getting the outdoor barbecue effect during a cold, wet Scottish summer. If you don't have one of these sturdy pans, you really should consider picking one up for a bargain price on the likes of Amazon and introduce a whole new dimension to your cooking. Alternatively, you can fry the burgers but do note in particular that they will take significantly longer to cook in a conventional frying pan.


In order to griddle the burger, the griddle pan should firstly be brought up to a very high heat. This will take a few minutes. While this is happening, oil the burger lightly on both sides with rapeseed oil - never oil the griddle pan directly.

Lay the burger carefully on to the hot griddle pan and cook for about four and a half minutes each side.

Boiled and cooled potatoes are halved for deep frying

The cooled potatoes should be halved lengthways for deep frying. They will need to be deep fried at a fairly high heat for about five minutes until crisp and golden.

Egg is broken in to small bowl for adding to frying pan

The egg should be broken in to a small cup or bowl in preparation for frying and seasoned with a little salt. This makes it much easier to add to the frying pan for around three minutes frying over a medium heat. If you want some more good tips for frying eggs this way, check out the video immediately below by clicking on the arrow in the centre of the screen.


You could if you wish flip the egg over and serve it "over easy" or with the yolk completely cooked.

Griddled buffalo burger left to rest

Lift the buffalo burger from the griddle pan to a plate, cover with foil and leave to rest for a few minutes.

Frying an egg sunny side up

Pour the egg carefully in to the hot, lightly oiled frying pan, remembering to reduce the heat after twenty seconds or so to low.

Griddling bacon rashers

The bacon rashers should be lightly oiled on both sides. They will take only a minute each side in the hot griddle pan to cook.

Deep fried potatoes are drained on kitchen paper

Drain the potato wedges on kitchen paper on a large plate.

Griddled bacon is added to bottom half of bread roll

Lift the bacon rashers on to the bottom half of your cut open roll on a serving plate.

Buffalo burger is added to bacon bed on roll and wedges are laid alongside

Lift the buffalo burger on to the bacon rashers and plate the wedges alongside, seasoning the potatoes with salt and vinegar if required.

Fried egg is laid on buffalo burger

Lift the fried egg carefully on to the buffalo burger and lightly close the roll over to serve.

Buffalo burger with bacon, fried egg and wedges is ready to serve

Wednesday, 27 May 2015

Scottish King Scallops Poached in Milk Canapes

Selection of canapes featuring Scottish king scallops poached in milk

I love scallops and cook them usually in one of three ways. The first two are popular in that I griddle or fry them but this method of poaching them gently in milk is perhaps not quite so well known. It is actually a foolproof method for ensuring they are cooked to perfection every time and don't become overcooked and rubbery as can so easily happen with these delectable but delicate little morsels. This way of serving the scallops as part of canapes was an experiment but I think it worked very well and the canape bases/additional toppings are of course infinitely variable. The following is precisely how I made this particular selection of Scottish king scallop canapes.

Bread (toasted) and crackers form the bases of the cnapes

Ingredients for 8 Canapes

8 Scottish king scallops
2 slices of bread
4 crackers of chosen type(s)
2 teaspoons tomato salsa
2 teaspoons soured cream with chives
2 teaspoons quail pate
Milk as required to poach scallops (roughly 3/4 pint)

Pate, tomato salsa and soured cream with chives for canapes

Directions

The cooking time required for this recipe is very short so it is advisable to do as much of the serving preparation as you can before you actually start cooking. I decided to serve four different types of canapes. Two of the crackers were to be spread with quail pate and two served plain with the scallops. I got these bases ready as my first step.
 
Cracker canape bases ready for poached scallops

Scallops are often purchased with the coral or roe (the orange bit) already having been discarded. Alternatively, many people remove and discard it at home before cooking the scallops. While it's true the coral is not as succulent and tasty  as the main scallop mussel, it is perfectly edible and enjoyable to eat, so why not leave it attached? With the price you may well have paid for your scallops, it's best to get your money's worth as much as possible!

Scottish king scallops added to poaching pot

Put the scallops in a pot or saucepan and pour in enough cold milk just to ensure they are completely covered.

Milk is poured in to pot to cover scallops

Put the pot on to a medium heat. The scallops are ready as soon as the milk just begins to simmer - don't let it get anywhere near a boil. At this stage, the scallops should be promptly removed from the poaching liquid with a large slotted spoon.

A drinking glass is used to cut circles from toast

The scallops will only take around two to three minutes so make the toast as soon as they are put on to heat.

Toast circles ready to form bases of canapes

Use a slender drinking glass or similar to cut two circles from each slice of toast.

Canape bases are ready for poached scallops

Spoon the tomato salsa on to two toast circles and the soured cream with chives on to the other two. Lay the toast circles on your serving plate or board.

When the scallops are removed from the milk, lay them on a plate, from which they can be lifted individually with tongs to top the prepared canape bases.

Poached scallops removed from milk pot

Monday, 25 May 2015

Wee Willie Winkie Sausages and Mediterranean Vegetables Casserole

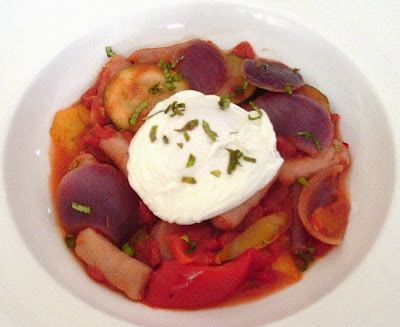
A lightly poached egg makes the perfect casserole topping

I've featured Wee Willie Winkie sausages a couple of times before on this blog but if you're unfamiliar with them, they're simply small, skinless pork sausages which are very popular in Scotland with children. They also make perfect cocktail sausages. They are usually gently fried before being served with fairly simple accompaniments. In this instance, however, I decided to bring these favourites from my own childhood in to the twenty-first century and incorporate them in a tasty casserole made from a selection of Mediterranean style vegetables. I have made the casserole a little bit spicy but that is optional, as is serving the poached egg on top.

Wee Willie Winkie sausages and Mediterranean vegetable selection for casserole

Ingredients (Serves Two)

12 ounce tray of assorted Mediterranean style roasting vegetables
Pack of 20 Wee Willie Winkie sausages
14 ounce can chopped tomatoes in tomato juice
1 red chilli pepper, seeded and moderately finely diced
2 garlic cloves, peeled and finely sliced
Pinch of dried basil
Pinch of dried oregano
Few drops of Tabasco sauce
Salt and pepper
2 eggs
Freshly sliced basil leaves to garnish

Herbs and spices for casserole

Directions

Start your oven preheating to 200C/400F/Gas Mark 6 while you are assembling and preparing your ingredients.

Prepared garlic and chilli for casserole

Put all of your ingredients in to a large casserole dish. Make sure there is plenty of room in the dish as you are going to have to stir them well to combine.

Sausage and vegetable casserole ingredients are added to cooking dish

Use a wooden spoon to gently stir,turn,fold the ingredients together until fully mixed.

Sausage and vegetable casserole ingredients are carefully stir folded together

Put the lid on the casserole dish and place it in the oven for half an hour.

Cooked casserole is gently stirred before being left to rest

Take your casserole from the oven and lift the lid off (careful of escaping steam). Gently stir/fold again to make sure everything is coated in the sauce. Put the lid back on and leave to rest for five minutes while you poach the eggs.

Egg ready for poaching

The way I poach eggs, it's only really possible to poach one egg in the pot at a time. If poaching two eggs, you could either do one at a time or use two pots as I did.

The video below shows my egg poaching process in full. Simply make sure your speakers are turned on and click on the arrow in the centre of the screen to play.


The eggs in this instance were poached for three minutes.

Poaching egg in water and vinegar

While the eggs are poaching, divide the sausage and vegetable casserole between two deep serving plates with a slotted spoon.

Wee Willie Winkie sasuages and vegetable casserole is plated

Use a clean slotted spoon to lift an egg on to the top of each casserole serving.

Poached egg is lifted on to the top of the casserole

Garnish each plate with the finely sliced basil leaves.

Poached egg is garnished with some finely sliced basil leaves

Saturday, 23 May 2015

Potted Scottish Salmon - An Easy and Tasty Fish Spread

Poached Scottish salmon potted in dill herb butter

A few weeks ago, I saw a programme on TV about potted shrimps, showing the full process from catching the shrimps, to cooking them to potting them for eating. It reminded me of how I made several variations of jellied conger eel last summer to delicious effect and I got to wondering how I could use the general concept to come up with a Scottish version of potted shrimp using a typically Scottish fish/seafood. I did consider langoustines first of all but sadly couldn't get hold of any so I came up with the perhaps slightly unorthodox idea of using salmon. The results were as good as I could ever have hoped for and this is a concept I will be doing a lot of experimentation with in future.

Scottish salmon and flavourants ready for poaching

Ingredients (Makes 4 Small Ramekins/Servings)

6 ounce Scottish salmon fillet, skin on
1/2 small white onion, peeled and sliced
1 bay leaf
6 to 8 whole black peppercorns
Salt
Combination of 2 parts water and 1 part white wine to fully cover salmon
*4 ounces/1 stick unsalted butter (do not use margarine or any other butter substitute)
1/2 teaspoon dried dill
White pepper

*It's very difficult to be precise with the amount of butter required as the size of the salmon flakes and the ramekins are variables. If in doubt, do prepare a little extra just in case. Alternatively, you can always prepare a little more immediately if you find yourself short.

Starting to poach Scottish salmon

Directions

Add the salmon, onion, peppercorns and bay leaf to a pot just large enough to contain the fillet laid flat. Season with salt and pour in the water/wine combination. Put the pot on a medium to high heat. As soon as the liquid just begins to simmer, turn off the heat. Do not let the liquid boil. Move to a cool part of your hob, cover and leave to cool completely. The residual heat poaches the salmon to perfection.

Salmon is left to cool in poaching liquer

When the salmon is completely cool, lift it from the water to a large plate.

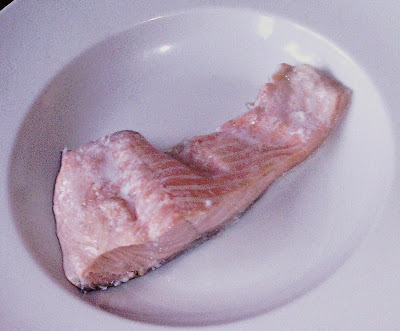
Poached and cooled salmon

The skin should easily peel from the salmon in one piece. Discard the skin and gently break the salmon in to moderately sized flakes with your fingers. Do use this opportunity to feel for and remove any bones which may remain.

Poached salmon is skinned and carefully flaked

Divide the salmon flakes evenly between four small ramekins. Do not press down or overfill as the butter has to penetrate through and cover the salmon flakes.

Poached salmon flakes are added to ramekins

Put the butter and dill in to a small saucepan, seasoning with a little white pepper. Put the pan on to a gentle heat, stirring regularly, until the butter is almost but not quite melted. Remove from the heat and gentle swirl until the butter is fully melted. This is to stop it splitting.

Butter is gently melted with dill and seasonings

Pour the butter in to the ramekins to almost fill.

Melted butter is poured over salmon flakes

Cover the ramekins and leave to cool and start to set. When cool, carefully transfer to the fridge and leave for a couple of hours to fully set. Overnight is fine.

Potted salmon is covered and left to cool

Serving Suggestions
 
Potted salmon served with hot buttered toast

There are a great many ways in which you can serve your potted salmon but it's worth remembering that unless you are serving it on something hot - like the toast in this first suggestion - you should take the ramekin(s) from the fridge about twenty minutes before serving to make it spreadable.

Potted salmon spread on hot toast

The potted salmon is delicious simply spread on hot toast but a few thin slice of cucumber takes it to an even higher level.

Cucumber makes a very simple but tasty addition to potted salmon

To make your dish really Scottish, oatcakes can be used to serve the potted salmon to equally delicious effect.

Potted salmon is also delicious with Scottish oatcakes